
Before I start this I want to make it clear I cannot take any credit for this tutorial. It rightly goes to Onestoppampershop and LovelettersUK.
I managed to get my photos looking like this 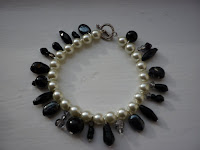
to this.

Onestoppampershop started by improving my photos for me last night and then gave me some tips to change the brightness, sharpness and crop the images a bit more where needed.
These are some of the end results from her playing around with my photos.


LovelettersUK then gave me and some other people on a different forum some simple tips to improve your photos if you don't have photoshop etc.
In Vista you have a program called Windows Photo Gallery. You can download the latest from here if you don't have it.
- Open Windows photo gallery
- Open your photo
- Choose FIX option on top toolbar
- Choose ADJUST EXPOSURE on right hand toolbar
- Increase the brightness to a state where you are happy with the brightness.
To get the background white it's best to take your photos on a white background such as a white piece of paper or white windowsil in the first place. By adjusting the brightness you can then improve the quality of the whiteness of the paper.
The edges will probably still have grey patches at this point as you can't take the brightness to 100% without losing sight of the picture altogether. These grey patches can be removed if you want by playing with the large paint brush in PAINT program that is free on every computer.
This tutorial isn't a technical professional way to get your pictures spot on, but it has improved mine 100% and I am thankful to both ladies for giving me tips last night and helping me out. I'm hoping better photos will set me on the road to getting sales now.
Please visit their shops at
One stop pamper shop (folksy)
One stop pamper shop (website)
LovelettersUK (folksy)
No comments:
Post a Comment